Deploy microk8s + microceph in multiple nodes
Purpose
This document show how to deploy microk8s cluster which integrate with microceph cluster as a external ceph StorageClass.
Architecture
Before we start to deploy the cluster, it will be nice if we can know more information about the microk8s and microceph cluster.
Single node microk8s
If we take a look at the single node microk8s which install from channel 1.28/stable, the components will look like this:

We can see kubelite daemon runs as subprocesses the scheduler, controller, proxy, kubelet, and apiserver.
Also the apiserver is connect to k8s-dqlite with kine, which runs the dqlite datastore that is used to store the state of Kubernetes to replace etcd as default.
The dqlite cluster use the Raft based protocol where an elected leader holds the definitive copy of the database to make sure the high availability.
The source code of microk8s is from the upstream kubernetes but include some patches, the trace those patches from source code we can do:
git clone https://github.com/canonical/microk8s.git
git checkout 1.28

# List all the repositories to build microk8s
find ./build-scripts/components -type f -regex ".*repository" | xargs cat

# List all the patch files
find ./build-scripts/components -type f -regex ".*patch"
To see the service run on the microk8s host, we can use below commands:
snap services microk8s

microk8s.daemon-apiserver-kicker  enabled  active    -
microk8s.daemon-apiserver-proxy   enabled  inactive  -
microk8s.daemon-cluster-agent     enabled  active    -
microk8s.daemon-containerd        enabled  active    -
microk8s.daemon-etcd              enabled  inactive  -
microk8s.daemon-flanneld          enabled  inactive  -
microk8s.daemon-k8s-dqlite        enabled  active    -
microk8s.daemon-kubelite          enabled  active    -

pa aux | grep calico

root        4980  2.8  0.3 1829316 62052 ?       Sl   Sep27  40:49 calico-node -felix
root        4981  0.0  0.3 1312936 49608 ?       Sl   Sep27   0:05 calico-node -monitor-token
root        4982  0.0  0.3 1386412 49420 ?       Sl   Sep27   0:07 calico-node -monitor-addresses
root        4983  0.0  0.3 1312680 53412 ?       Sl   Sep27   0:09 calico-node -allocate-tunnel-addrs
root        4984  0.0  0.3 1312424 50024 ?       Sl   Sep27   0:08 calico-node -status-reporter
ubuntu   2094581  0.0  0.0   7004  2072 pts/0    S+   16:08   0:00 grep --color=auto calico
Read more:
Microk8s cluster
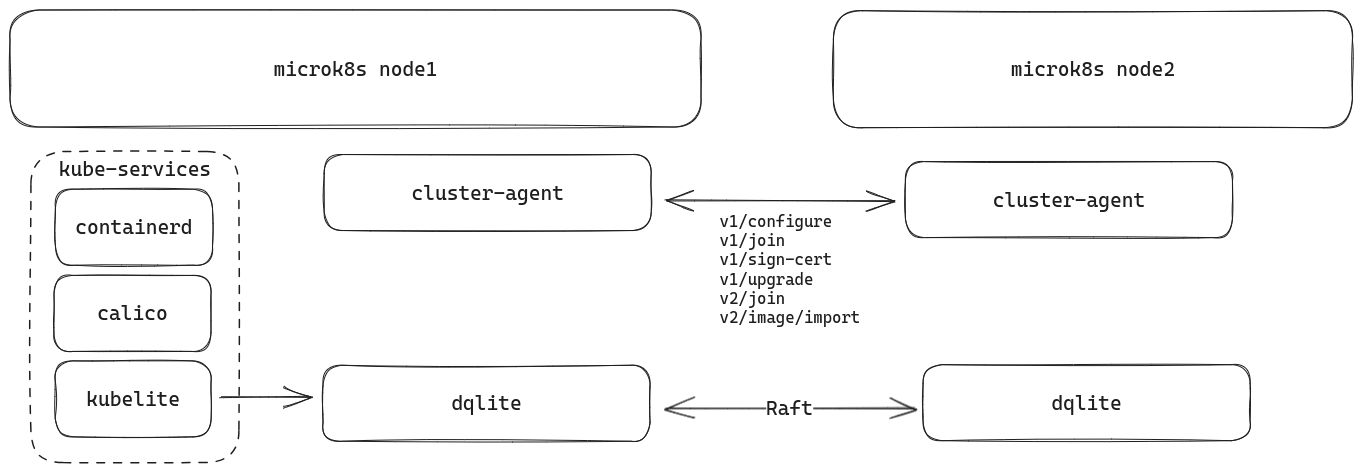
For cluster mode, we can see cluster-agent become the entrypoint to trigger those join/sing-cert/configuring tasks.
The architecture is very similar to single node but just some service become a cluster.
Read more:
Microceph cluster
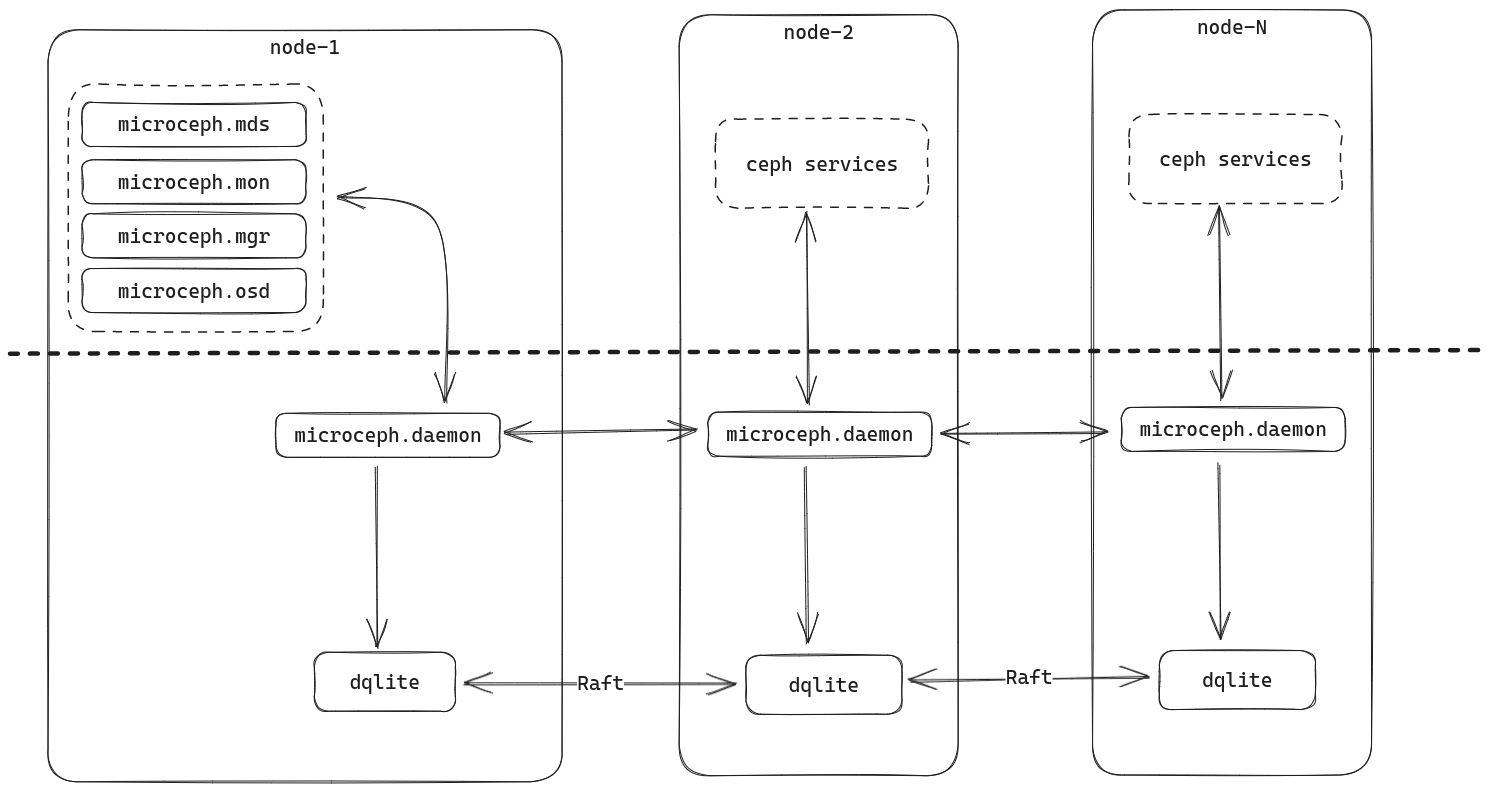
The microceph snap packages all the required ceph-binaries, dqlite and a small management daemon (microcephd) which ties all of this together. Using the light-weight distributed dqlite layer, MicroCeph enables orchestration of a ceph cluster in a centralised and easy to use manner.
See HACKING.md for more details.
Deploy
Requirement
- multipass
Install dependency
We will use multipass to simulate three machines in single instance. This step can be replaced if you have multiple machines in real world.
sudo snap install multipass
Launch vms
# We will use 3 nodes for deployment.
export NODES=(1 2 3)

for number in $NODES ; do \
	multipass launch -c 4 -m 8G -d 30G jammy -n node-$number ; \
done

# Check we have three machines
multipass list
Deploy microk8s cluster using snap
# For each node, install microk8s from the channel 1.28/stable using snap.
for number in $NODES ; do \
	multipass exec node-$number -- sudo snap install microk8s --channel 1.28/stable --classic; \
done

# For each node, wait until all the microk8s indicates that it is ready.
for number in $NODES ; do \
	multipass exec node-$number -- sudo microk8s status --wait-ready ; \
done

# For each node, excluding the first node, generate the join command on the first node then execute it on the respective target node.
for number in $NODES ; do \
	if [ $number != 1 ]; then \
                join_cmd=$(multipass exec node-1 -- sudo microk8s add-node | grep "microk8s join" | head -n 1) ; \
		multipass exec node-$number -- eval sudo $join_cmd ; \
	fi \
        ;
done

multipass exec node-1 -- sudo microk8s kubectl get node
Deploy microceph cluster using snap
# For each node, install microceph from the channel latest/edge using snap.
for number in $NODES ; do \
	multipass exec node-$number -- sudo snap install microceph --channel latest/edge ; \
done

multipass exec node-1  -- sudo microceph cluster bootstrap
multipass exec node-1  -- sudo microceph cluster list

# The step to create cluster in microceph is similar to microk8s. We generate the token on the first node and used it on the target node.
for number in $NODES ; do \
	if [ $number != 1 ]; then \
		token=$(multipass exec node-1  -- sudo microceph cluster add node-$number) ; \
		multipass exec node-$number -- sudo microceph cluster join $token ; \
	fi \
        ;
done

multipass exec node-1  -- sudo microceph cluster list

# On each node, create OSD.
for number in ${NODES} ; do \
	multipass exec node-$number -- bash -c \
		' \
		loop_file="$(sudo mktemp -p /mnt XXXX.img)" ; \
		sudo truncate -s 1G "${loop_file}" ; \
		loop_dev="$(sudo losetup --show -f "${loop_file}")" ; \
		minor="${loop_dev##/dev/loop}" ; \
		sudo mknod -m 0660 "/dev/sdia" b 7 "${minor}" ; \
		sudo microceph disk add --wipe "/dev/sdia" ; \
		' ; \
done

# Check microceph status
multipass exec node-1  -- sudo microceph status
multipass exec node-1  -- sudo microceph.ceph status
multipass exec node-1  -- sudo microceph disk list
multipass exec node-1  -- sudo microceph.ceph osd df
Enable microceph on microk8s
Integration between microk8s and microceph

When we enable the rook-ceph addons, which is a core-plugin in microk8s, actually we use helm in the backend to install the rook on ceph-rook namespace.
See microk8s-core-addons for more details.
Then we use the plugin script, which will auto-detect the local’s microceph, to define a CephCluster CRD, which connects to external ceph(microceph) and run a series of operation action to import secret, import user, and create storage class.
multipass exec node-1  -- sudo microk8s enable rook-ceph
multipass exec node-1  -- sudo microk8s connect-external-ceph

# Show components inside namespace rook-ceph
multipass exec node-1 -- sudo microk8s kubectl get all -n rook-ceph
Enable ceph dashboard
Using microceph.ceph mgr command to enable dashboard module. Also create a self-signed certification, create a user admin with password adminadmin.
multipass exec node-1  -- sudo microceph.ceph mgr module enable dashboard
multipass exec node-1  -- sudo microceph.ceph dashboard create-self-signed-cert
# Create user admin which password is adminadmin.
multipass exec node-1  -- bash -c 'echo adminadmin | sudo tee /root/pwd.txt'
multipass exec node-1  -- sudo microceph.ceph dashboard ac-user-create admin -i /root/pwd.txt administrator
multipass exec node-1  -- sudo microceph.ceph mgr services
Deploy stateful-set
Deploy below statefulset yaml:
apiVersion: apps/v1
kind: StatefulSet
metadata:
  name: k8s-summit-demo
spec:
  selector:
    matchLabels:
      app: nginx
  serviceName: "nginx"
  replicas: 3
  minReadySeconds: 5
  template:
    metadata:
      labels:
        app: nginx
    spec:
      terminationGracePeriodSeconds: 10
      containers:
      - name: nginx
        image: registry.k8s.io/nginx-slim:0.8
        ports:
        - containerPort: 80
          name: web
        volumeMounts:
        - name: demo-volume-1
          mountPath: /usr/share/nginx/html
  volumeClaimTemplates:
  - metadata:
      name: demo-volume-1
    spec:
      accessModes: [ "ReadWriteOnce" ]
      storageClassName: ceph-rbd
      resources:
        requests:
          storage: 1Gi
Transfer file into first node and deploy it with microk8s kubectl command
multipass transfer ./stateful-set.yaml node-1:
multipass exec node-1  -- sudo microk8s kubectl apply -f ./stateful-set.yaml

multipass exec node-1  -- sudo microk8s kubectl get pod,pvc,pv
Terminal record
The terminal record can be found on asciinema